Pages

Friday, April 30, 2010

Weekend Cooking: Can This Really Be Weight Watchers?


Weight Watchers works - no doubt about it! Just over ten years ago, I lost 25 pound and became a lifetime member. But (and you knew there was one coming), somehow those pounds have managed to creep back on again. Luckily I'm tall and have more area to distribute the extra weight. Still, it's time to address the issue....

I've started walking, but may ramp things up by joining the "Y" and attending WW meetings. In the meantime, some Weight Watchers recipes are appearing on the weekly meal plan. We'll see how it goes for the month of May before deciding on more drastic measures!

This cardamom-orange tenderloin is my new favorite pork recipe. Every member of the family liked it, and I'll definitely make it again. Although I'd heard of cardamom, I didn't have it on hand (warning - the little bottle was pricey). You can read more about the spice here.


Cardamom-Orange Pork Tenderloin

1 1/2 tablespoons dark brown sugar
1/2 teaspoon ground cardamom
1/2 teaspoon coarsely ground black pepper
1/4 teaspoon salt
1/4 teaspoon ground cinnamon
1 (1 pound) pork tenderloin, trimmed
1 large navel orange

1. Preheat oven to 425 degrees

2. Combine first 5 ingredients in a small bowl, rub spice mixture over pork. Place pork in an 11 x 7 baking dish coated with cooking spray. Bake at 425 degrees for 22 to 25 minutes or until a thermometer registers 160 degrees (slightly pink) or desired degree of doneness. Cover dish, and let pork stand 5 minutes.

3. While pork cooks, grate rind from orange to measure 1 teaspoon; squeeze juice to measure 1/3 cup. Transfer cooked pork to serving platter, reserving drippings in dish. Add rind and juice to drippings, scraping dish to loosen browned bits. Cut pork into slices. Pour sauce over pork slices

3 points for 3 ounces of pork plus 1 tablespoon sauce

From Weight Watchers Five Ingredient 15 Minute Recipes (specialty magazine from Oxmoor House)

Note: I doubled the recipe (still used and 11 x 7 pan), so there would be leftovers for lunch.

Weekend Cooking, hosted at Beth Fish Reads, is open to anyone with a food-related post to share: Book (novel, nonfiction) reviews, cookbook reviews, movie reviews, recipes, random thoughts, gadgets, fabulous quotations, photographs. If your post is even vaguely foodie, feel free to grab the button, head over to Beth Fish Reads, and link up anytime over the weekend.
Monday, April 26, 2010

Monday Meal Planning

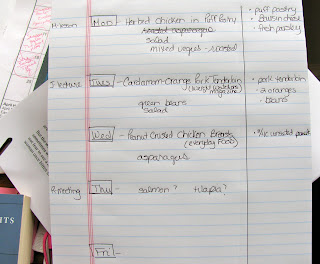
It's all about organization.... and flexibility. Every Sunday or Monday, I compose a "Master Meal-Planning Sheet" and select a few dishes to prepare early in the week. Family activities that impact the dinner hour (or my ability to cook) are listed on the left, the menu goes in the center, and a grocery list goes on the right. Here's what this week's sheet looks like, so far:If we're out all day, I may choose a crock-pot meal that's ready when we get home. When there's little time to spare, a stir-fry is quick and easy. On the rare day when no activities are scheduled, I may experiment with something more elaborate.

My meal-planning sheet looks pretty simple now, but wait a few hours... meetings are added, games or lessons get changed, and the unexpected always arises. By starting with just three or four definite meals, I can make adjustments as needed during the week and, if I'm lucky, have some leftovers for lunches.

A trip to the grocery store is part of my Monday routine, but another stop on Thursday or Friday is inevitable. We always need more milk and produce and, if the beginning of the week has gone as planned, I'll buy fish or meat for a couple more dinners. Also, by later in the week, Margaret may have an idea for a weekend dessert and I can pick up those ingredients, too.

Do you have a meal-planning system, or do you keep a stocked refrigerator and decided day-by-day what's for dinner?

Friday, April 23, 2010

Chocolate Raspberry Squares


I made these delicious bars with my older sister one evening when she came home from college. If you're a person who likes a chocolate and raspberry flavor combination, you will love these! They are pretty easy to make, which is a plus. My mom got this recipe from Beth Fish.

Ingredients:

1-1/4 cups all purpose flour
1-1/4 cups Quaker Oats (quick or old fashioned, uncooked)
1/3 cup granulated sugar
1/3 cup packed brown sugar
1/2 teaspoon baking powder
1/4 teaspoon salt
3/4 cup (1-1/2 sticks) butter, chilled and cut into pieces
1/4 cup chopped almonds, optional
3/4 cup raspberry preserves
1 cup (6 ounces) semisweet chocolate chips (we used Ghirardelli)
1/2 cup (3 ounces) semisweet chocolate chips for drizzling (again, Ghirardelli)

Directions:

1.) Heat oven to 350 F. In large bowl, combine flour, oats, sugars, baking powder, and salt. Cut in butter with pastry blender or two knives until mixture is crumbly. Reserves 1 cup oat mixture for topping, set aside. Press remaining mixture onto bottom of ungreased 8-inch square pan. Bake 10 minutes. Meanwhile, stir almonds into reserved oat mixture.
2.) Spread preserves evenly over partially baked crust to within 1/4 inch of edges; sprinkle evenly with 1 cup of chocolate chips and then sprinkle the reserved oat mixture on top. Pat topping gently. Bake 30 to 35 minutes or until golden brown. Cool completely.
3.) Melt the chocolate chips and drizzle over the top. Let bars stand until set. Cut into bars and store tightly covered.

Notes:
Instead of almonds, we used walnuts.

Tuesday, April 20, 2010

Carrot-Pineapple Bundt Cake with Sour Cream Frosting


My mom, older sister, and I made this together for a family gathering. We found this recipe in the Everyday with Rachel Ray magazine. To make sure we had enough for our family, we doubled the recipe to fill a 12-cup Bundt pan.

My grandpa especially loved this, so I sent the two leftover pieces home with him. The next day, my grandma called to tell me how much Grandpa enjoyed the cake!

Ingredients:

1 cup flour
1 teaspoon baking powder
1/2 teaspoon baking soda
1/2 teaspoon ground cinnamon, plus more for sprinkling
1/4 teaspoon plus 1 pinch salt
1 cup packed light brown sugar
1/2 cup sour cream
1/4 cup vegetable oil
1 egg, at room temperature
1 teaspoon pure vanilla extract
1 cup loosely packed shredded carrots (about 2 medium)
1/2 cup chopped fresh or canned pineapple
1/2 cup chopped walnuts
1 cup confectioners' sugar, sifted
3 tablespoons unsalted butter, softened

** Double the ingredients and bake in a 12-cup Bundt pan for 10 to 15 more minutes.

Directions:
  • Preheat the oven to 350 and lightly grease a 6-cup nonstick Bundt pan.
  • In a medium bowl, whisk together the flour, baking powder, baking soda, cinnamon, and 1/4 teaspoon salt.
  • In a large bowl, whisk together the brown sugar, 1/4 cup sour cream, the oil, egg, and vanilla until smooth.
  • Stir in the carrots, pineapple, and walnuts.
  • Stir in the flour mixture until just combined.
  • Pour the batter into the prepared pan and bake until a toothpick inserted in the center comes out clean, about 55 minutes.
  • Transfer to a rack to cool for 15 minutes, then invert onto the rack, remove the pan, and let cool completely.
  • Using a wooden spoon, beat the confectioners' sugar and butter until smooth.
  • Whisk in the remaining 1/4 cup sour cream and 1 pinch salt.
  • Drizzle the frosting on top of the cake and sprinkle with cinnamon.
Notes: Be sure to lightly grease the pan. What fun is a bundt cake if you can't get it out of the pan? Also, a mixer isn't need for this recipe -- just a whisk!

Saturday, April 10, 2010

Weekend Cooking: Easter Breakfast

We love leisurely family breakfasts but, our busy schedules don't often allow time to sit together for a morning meal. Holiday breakfasts have become a family tradition. Margaret and I pour over cookbooks and recipes searching for the perfect dish. Last Christmas, we discovered a new favorite - Nan's Baked French Toast. When it came time to choose an Easter Breakfast, the choice was unanimous!

Nan's Baked French Toast

Cut bread into 1-inch squares; enough to cover the bottom of a greased 9 x 13 pan.

Lightly beat 2 eggs, 3 Tablespoons sugar, and 1 teaspoon vanilla.
Stir in 2 1/4 cups milk.
Pour over bread, turning pieces to coat well.

At this point, you may stop, cover, and refrigerate over night, if you wish.

Preheat oven to 375ยบ F.

Combine 1/2 cup flour, 6 Tablespoons sugar, 1/2 teaspoon cinnamon (optional).
Cut in 1/4 cup butter until mixture resembles coarse crumbs.

Scatter 1 cup blueberries and/or strawberries over the bread.
Sprinkle with the crumb mixture.

Bake about 40 minutes until golden brown.

Note: At Christmas, the bread/milk mixture was in the refrigerator overnight and needed a little extra cooking time. Last weekend, I prepared it in the morning and 40 minutes in the oven was perfect. Looking at the picture, I realized the fruit was added after the crumb mixture instead of before.... oh well, it was still delicious.

Nan blogs at Letters from a Hill Farm. I've tried several of her recipes and have never been disappointed!

Weekend Cooking, hosted at Beth Fish Reads, is open to anyone with a food-related post to share: Book (novel, nonfiction) reviews, cookbook reviews, movie reviews, recipes, random thoughts, gadgets, fabulous quotations, photographs. If your post is even vaguely foodie, feel free to grab the button, head over to Beth Fish Reads, and link up anytime over the weekend.

Thursday, April 1, 2010

Quick & Easy Fudgey Brownies


My sister was coming home from college on a Friday night, and I received a text message from her saying, "Bake something good!" I found this recipe in the Chocolate Collection cookbook and decided to make these. They lasted from Friday night until Sunday afternoon. Needless to say, my family loved them! My mom, JoAnn, said these were the best brownies she has ever had.

True to their name, these Quick & Easy Fudgey Brownies are, well, quick and easy. And the clean-up wasn't bad, either.

Ingredients:

For the Brownies:
4 ounces of unsweetened baking chocolate, broken into pieces (we used Ghirardelli)
3/4 cup butter or margarine (we used butter)
2 cups sugar
3 eggs
1-1/2 teaspoons vanilla extract
1 cup all-purpose flour
1 cup chopped nuts, optional (we used walnuts)

For the Frosting:
3 ounces unsweetened baking chocolate, broken into pieces (again, Ghirardelli)
1 cup miniature marshmallows
1/2 cup butter or margarine, softened (again, butter)
1/3 cup milk
2-1/2 cups powdered sugar (we recommend sifting it first)
1/2 teaspoon vanilla extract

Directions for the Brownies:
  • Heat oven to 350°F.
  • Grease 13x9x2-inch baking pan.
  • In large microwave-safe bowl, place chocolate and butter. Microwave at HIGH 1-1/2 to 2 minutes or until chocolate is melted and mixture is smooth when stirred.
  • Add sugar; stir with spoon until well blended.
  • Add eggs and vanilla; mix well.
  • Add flour and nuts, if desired; stir until well blended.
  • Spread into prepared pan.
  • Bake 30 to 35 minutes or until wooden pick inserted in center comes out almost clean.
  • Cool in pan on wire rack. Frost when brownies are cooled completely.

Directions for the Frosting:
  • In medium saucepan over low heat, melt chocolate, stirring constantly.
  • Add marshmallows; stir frequently until melted. (Mixture will be very thick and will pull away from the side of the pan.)
  • Spoon mixture into a small mixer bowl; beat in softened butter.
  • Add milk gradually; beating until smooth.
  • Add powdered sugar and vanilla; beat to desired consistency.

Notes:

Be patient for the marshmallows to melt when you're making the frosting. If you don't, you're going to end up with chunky frosting. Not very appetizing. Also, be sure that the brownies have cooled completely before you frost them. Otherwise, the frosting will melt, lose its perfect consistency, and look more like chocolate syrup. And that's not really what we're going for here.

You can use any kind of nut to put in these brownies. I used walnuts, but next time I might try hazelnuts or almonds.

I will definitely make these delicious brownies again!

Welcome to Our Kitchen

Lakeside Musing is expanding into the kitchen! In early March, I wrote a Weekend Cooking post, titled Baking as Therapy, that featured truffles made by my 16-year-old daughter Margaret (previously known as Twin A). The comments, so positive and encouraging, were the inspiration behind this blog.

I've enjoyed spending time in the kitchen for as long as I can remember, and Margaret has been baking with me since before she could even reach the counter. She received her first cookbook (Kids Cook!) not long after she learned to read, and started choosing recipes to try right away.

We thought a blog would be a fun project to work on together - cooking, baking, photographing, and writing. Lakeside Kitchen will chronicle our culinary adventures. Thanks for joining us.